Unveiling the Landscape of Diamond Peak: A Comprehensive Guide to the Map
Related Articles: Unveiling the Landscape of Diamond Peak: A Comprehensive Guide to the Map
Introduction
With enthusiasm, let’s navigate through the intriguing topic related to Unveiling the Landscape of Diamond Peak: A Comprehensive Guide to the Map. Let’s weave interesting information and offer fresh perspectives to the readers.
Table of Content
Unveiling the Landscape of Diamond Peak: A Comprehensive Guide to the Map
The Diamond Peak map, a prominent feature within the realm of gaming, offers a unique and captivating landscape for players to explore and conquer. This guide delves into the intricacies of this map, exploring its key features, strategic advantages, and the diverse gameplay opportunities it presents.
Understanding the Diamond Peak Map: A Detailed Overview
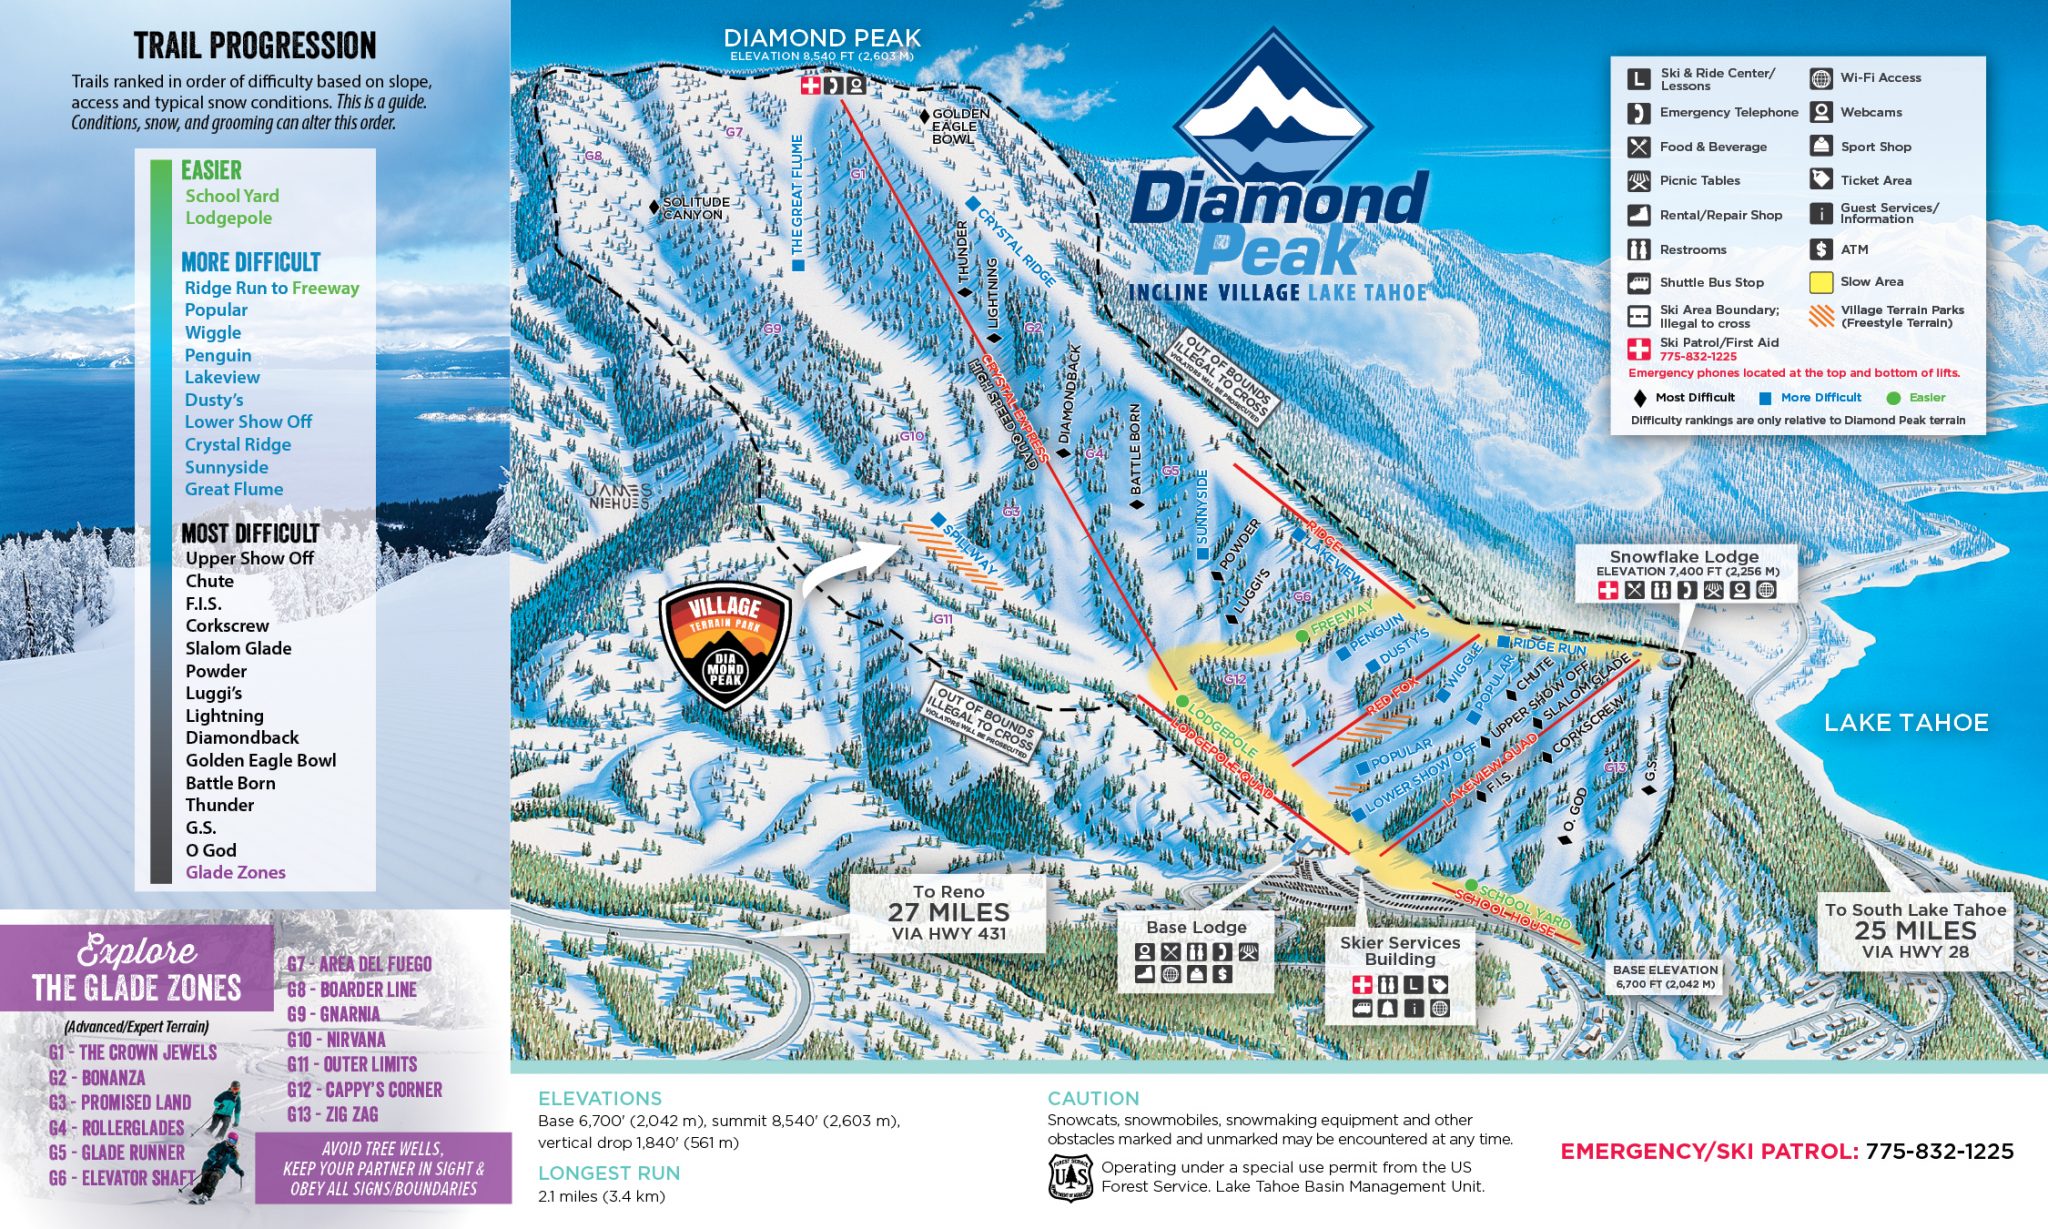
Diamond Peak, known for its distinctive terrain and strategic locations, stands out as a popular choice for various game modes. Its design incorporates a balanced blend of open spaces and enclosed areas, providing players with a dynamic environment for tactical maneuvers and strategic gameplay.
Key Features and Locations:
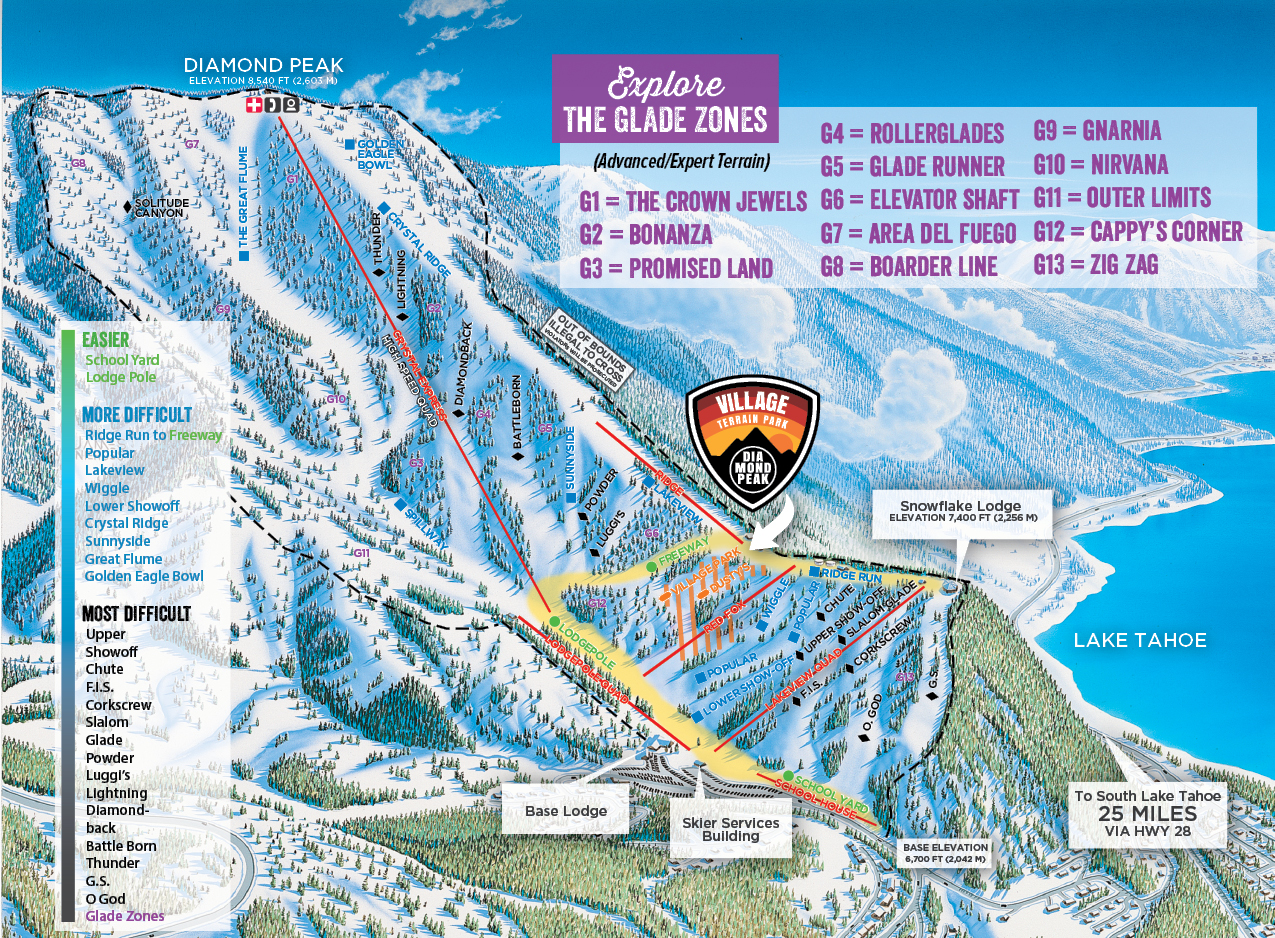
- Diamond Peak Summit: The highest point on the map, offering a commanding view of the surrounding area. This location is often a hotbed of conflict, as players vie for control of its strategic vantage point.
- Central Plaza: A large open space situated at the heart of the map, providing ample room for vehicle combat and large-scale engagements. Its central location makes it a crucial point of contention, influencing the flow of the battle.
- Mountain Pass: A narrow passage connecting the north and south sections of the map, offering a strategic chokepoint for controlling the flow of enemy forces. Its limited space makes it ideal for ambushes and close-quarters combat.
- Ruined City: A dilapidated urban area located on the western side of the map, offering a maze of streets and buildings for close-quarters combat and stealth tactics. Its numerous entry points and tight corridors create opportunities for flanking maneuvers and surprise attacks.
- Forest Area: A densely forested region located on the eastern side of the map, providing cover for infantry and sniper positions. Its dense foliage offers concealment and strategic advantages for players utilizing stealth tactics.
Strategic Advantages and Gameplay Opportunities:
The Diamond Peak map offers a diverse range of gameplay opportunities, catering to various playstyles and strategies. Its unique layout encourages players to adapt their tactics and utilize the map’s features to their advantage.
- Dominating the High Ground: The Diamond Peak Summit offers a strategic vantage point for players to control the flow of the battle. By securing this location, players gain access to a wide field of view, allowing them to spot enemies and direct fire support.
- Controlling Key Chokepoints: The Mountain Pass and the entrances to the Ruined City serve as crucial chokepoints, allowing players to bottleneck enemy forces and control the flow of the battle. By securing these locations, players can prevent enemy advances and dictate the pace of the engagement.
- Utilizing Cover and Concealment: The Forest Area and the Ruined City provide ample cover and concealment for infantry and stealth-based tactics. Players can use these areas to ambush enemies, set up traps, and gain a tactical advantage.
- Leveraging Vehicle Combat: The Central Plaza and the open spaces surrounding the Diamond Peak Summit offer ideal locations for vehicle combat. Players can utilize tanks, armored vehicles, and other heavy weaponry to dominate these areas and control the flow of the battle.
Tips for Mastering Diamond Peak:
- Embrace Strategic Positioning: Utilize the map’s terrain and cover to gain a tactical advantage.
- Control Key Locations: Secure the Diamond Peak Summit, the Mountain Pass, and the entrances to the Ruined City to control the flow of the battle.
- Adapt Your Tactics: Utilize different strategies based on the game mode, your team composition, and the enemy’s tactics.
- Utilize Vehicle Combat: Take advantage of the open spaces and strategic locations to engage in vehicle combat.
- Communicate Effectively: Coordinate with your team to execute strategies and achieve victory.
FAQs About Diamond Peak Map:
Q: What are the most common strategies used on the Diamond Peak map?
A: Common strategies include controlling the Diamond Peak Summit for a commanding view, securing chokepoints like the Mountain Pass, and utilizing flanking maneuvers in the Ruined City.
Q: What are the best weapons and equipment for playing on the Diamond Peak map?
A: The best weapons and equipment vary depending on your playstyle and the game mode. Sniper rifles and long-range weapons are effective from the Diamond Peak Summit, while shotguns and close-range weapons are ideal for the Ruined City.
Q: How can I improve my performance on the Diamond Peak map?
A: Familiarize yourself with the map’s layout, practice different strategies, and learn from your mistakes. Communicating with your team and coordinating attacks is also crucial.
Conclusion:
The Diamond Peak map offers a dynamic and engaging gameplay experience, providing players with a variety of strategic options and tactical challenges. By understanding its key features, strategic advantages, and diverse gameplay opportunities, players can unlock the full potential of this captivating map and achieve victory in their battles.
![]()

Closure
Thus, we hope this article has provided valuable insights into Unveiling the Landscape of Diamond Peak: A Comprehensive Guide to the Map. We hope you find this article informative and beneficial. See you in our next article!